I have a new project (technically two) hot off the needles. Anytime someone I know has a new bundle of joy, I feel an ovewhelming urge to knit something tiny to welcome the little one to the big world. In this particular case, the arrival of said baby also meant a promotion to Big Sister for an older sibling. As a huge fan of the Coastal Knits book and also the miniature versions in Coastal Kids, the Wee Wildflower pattern has been in my queue for quite some time. It's such an adorable piece, and it has POCKETS.
This seemed like the perfect time to whip one of these up. In the case of the big sister....well, that's a big deal. Clearly, only two sweaters would do (matching, of course). I was thrilled to find a suitable yarn in my stash that had enough yardage to complete both sweaters, an indie-dyed polwarth and silk blend. Now, you may have heard of Second Sock Syndrome. This is where you finish one sock, and the other feels like an absolute slog, and it takes you forever to complete it. I feel as though this affliction is even more serious when it manifests as Second Sweater Syndrome. Therefore, I always reccomend that if you are knitting two of anything and those things are not the same size, ALWAYS DO THE LARGER ITEM FIRST. This makes the progession of the smaller item feel as though it is going faster than the first (as it should), and if you struggle to maintain project focus, the additional motivation in this approach is critical.
One of the features of the Wee Wildflower patern is that it is knit flat and seamed. I expect this may scare off a few knitters, but I promise it's not as hard as it seems (see what i did there?). There are some advantages to seamed knitting, one of which is that seams in knitted garment add structure and support the stitching. Where it *can* get a little tricky is sewing sleeves into sleeve holes, especially when the 2 circumferences do not match up perfectly. The first time I did this, I had not distributed the stitches very well. It was a disaster, and I ended up taking it apart. There is a much better way, and I would like to share my preferred method.
I start by marking the midpoint on the sleeve, and identifying the top and bottom points in the armhole. Then I loosely put the sleeve in the armhole.
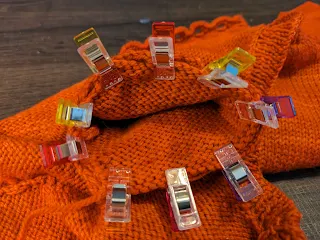
Next, I line up the midpoint of the sleeve with the top of the armhole, and the ends with the bottom of the armhole, and then I secure these points with sewing clips.
Next, I work my way around the armhole, stretching and securing the sleeve so that it is eased in to the full space of the armhole and is also evenly distriubted throughout. During this process, I will stretch, inspect, shift and secure until I am satisfied that the sleeve is properly positioned and stretched evenly all the way around.
At this point, I secure a piece of yarn and sew the sleeve in place using the mattress stitch and removing clips as I go around. I have always been pleased with the results when doing it this way, and I haven't had to pull it out and start over, like I did before I started using this technique. The sweaters are complete now and have been gifted. I hope the recipients enjoy the sweaters as much as I enjoyed crafting them. Next up on the needles are a few Christmas presents...stay tuned!
A wicked good blog about homestead happenings in the shadow of Mount Katahdin, Maine. Many ramblings are sure to happen here, including, but not limited to, knitting, sewing, chickens, gardening, canning, freeze drying, general homestead wanna-be stuff (you can be a homesteader with just chickens, right?!?), and any other activities that manage to capture my short little attention span at the time.
Search World On A String Designs
Showing posts with label seamed knitting. Show all posts
Showing posts with label seamed knitting. Show all posts
Thursday, December 7, 2023
Subscribe to:
Comments (Atom)


