Search World On A String Designs

Thursday, December 28, 2023

How to Render Lard

Nearly all the meat our family consumes is grown within a mile of our home. We raise and process our own meat chickens. We also buy a pig and a half a cow from our neighbors, who raise them. One of the perks of this is that I request the pig fat when the animals are processed, so I can render it into lard. Home-rendered lard is a fabulous thing to have on hand. The best of the lard is great for baking - it results in flaky pie crusts, with a mild (and not porky) flavor. While lard gets a bad rep, it is really the shelf-stable lard from the grocery store (which is shelf stable because it has been hydrogenated) that is the real villian. Home-rendered lard has not gone through that process, and doesn't have the same unhealthy characteristics - the shelf stable version contains trans fats, whereas the home-rendered version does not. Shelf stability is a great feature on an industrialized scale, as it reduces waste and cost. However, on our small homestead, we simply store the unrendered fat in the freezer, and the rendered lard in the fridge until we are ready to use it. Problem solved! The result is delicious lard for our family without the health risks of hydrogenated fats.

We use lard a lot for frying eggs or meat, or for anything we want to make crispy. I often make freezer batches of breakfast burritos, and when put in the microwave, the tortillas get soft and sometimes soggy. I heat them in the microwave, then finish them off on the stove in a bit of rendered lard. They crisp right up and taste amazing. Lard is also great for frying pretty much anything and gives delightfully crispy results. So *how* does one home render lard, you ask? Great question; I'd love to tell you. Our pig fat comes from the butcher in a large, several-pound package, vacuum sealed like our meat. I use a crock pot to melt it down, and the first step is cutting up the fat.
A slab of pig fat, being cut up into slices
I start with the fat frozen solid. It takes a bit of elbow grease to get through the thicker parts, but as the fat warms it will start to melt on hands and can make the process quite slippery. I start by cutting the fat down into big strips that are no wider than my knife is long. Then, I cut off slices about 1/4 to 1/2-inch thick. Next, I cube these down, then add them to my crock pot over low heat.
A thick slab of pig fat on a cutting board, being diced into small pieces.
The smaller the chunks, the faster the lard will render. You certainly want them to be chunks of 1" or less. I aim for 1/2 to 1/4-inch chunks, and this is often led by how much available time I have to dice it up - on a busy morning, the pieces are larger. If your butcher will grind it for you, or if you have a grinder, such as this KitchenAid attachment, then it will significantly cut down on processing time. I have the KitchenAid attachment, but I normally just cut it up with a knife, as I don't want to bother cleaning fat out of the grinder attachment and typically I don't mind if it sits in the crock pot a few hours longer.
Cubed lard in a crock pot, melting down
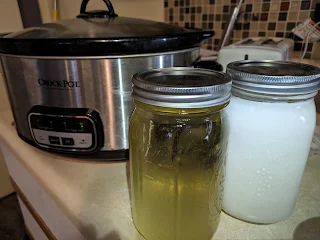
As the fat heats, it will gradually melt. I come back every couple of hours, and when there is enough liquid, I simply scoop some off the top and store in a Mason jar. I do filter my lard, and I do this with a funnel and cheesecloth.
Crock pot with fat melting into lard. A spoon is used to take liquid out and transfer to the jar, with a funnel lined with cheesecloth acting as a filter
As you can see, the liquid fat is an off-white color and semi-transparent. As it cools, however, it will harden into a snow-white solid in the jar.
Jars of processed lard next to the crock pot where they were rendered. One jar is still hot and contains a semi-transparent off-white liquid. The other jar has cooled, and the contents have solidified and turned white
I highly recommend givnig this a try. Your home-rendered lard can serve a replacement for anything you'd use lard or Crisco to prepare in your kitchen, and it does it without unhealthy trans fats. You will gain more control and confidence about what you are consuming, where it came from, and how the animals were treated. If you don't have access to your own pig fat, you may be able to obtain some from your local butcher - it's worth an ask. Leaf fat is the prime material for this job; it is the fat around the kidneys of a pig. This was prepared with back fat, which contains more meaty bits. I find that the first draw of liquid from the back fat is completely suitable for pastry baking, and it has an odorless product. The closer you get to the end of the render, there may be more color and potentially a bit of a piggy flavor...sort of like bacon. This is great for frying eggs, making biscuits, or any savory type of cooking. Just save your first draw and label it well for pastries and sweets.

Thursday, December 7, 2023

Wee Wildflower Gifts and Easing in Sleeves in Seamed Knitting

I have a new project (technically two) hot off the needles. Anytime someone I know has a new bundle of joy, I feel an ovewhelming urge to knit something tiny to welcome the little one to the big world. In this particular case, the arrival of said baby also meant a promotion to Big Sister for an older sibling. As a huge fan of the Coastal Knits book and also the miniature versions in Coastal Kids, the Wee Wildflower pattern has been in my queue for quite some time. It's such an adorable piece, and it has POCKETS.
A child wearing a red sweater with pockets and flower details
This seemed like the perfect time to whip one of these up. In the case of the big sister....well, that's a big deal. Clearly, only two sweaters would do (matching, of course). I was thrilled to find a suitable yarn in my stash that had enough yardage to complete both sweaters, an indie-dyed polwarth and silk blend. Now, you may have heard of Second Sock Syndrome. This is where you finish one sock, and the other feels like an absolute slog, and it takes you forever to complete it. I feel as though this affliction is even more serious when it manifests as Second Sweater Syndrome. Therefore, I always reccomend that if you are knitting two of anything and those things are not the same size, ALWAYS DO THE LARGER ITEM FIRST. This makes the progession of the smaller item feel as though it is going faster than the first (as it should), and if you struggle to maintain project focus, the additional motivation in this approach is critical. One of the features of the Wee Wildflower patern is that it is knit flat and seamed. I expect this may scare off a few knitters, but I promise it's not as hard as it seems (see what i did there?). There are some advantages to seamed knitting, one of which is that seams in knitted garment add structure and support the stitching. Where it *can* get a little tricky is sewing sleeves into sleeve holes, especially when the 2 circumferences do not match up perfectly. The first time I did this, I had not distributed the stitches very well. It was a disaster, and I ended up taking it apart. There is a much better way, and I would like to share my preferred method.

An unassembled baby sweater, surrounded by scissors and sewing clips
I start by marking the midpoint on the sleeve, and identifying the top and bottom points in the armhole. Then I loosely put the sleeve in the armhole.
An unassembled sweater, with the sleeve positioned within the armhole, with right sides together
Next, I line up the midpoint of the sleeve with the top of the armhole, and the ends with the bottom of the armhole, and then I secure these points with sewing clips.
A sleeve being positioned for sewing into an armhole on an unassembled sweater
Next, I work my way around the armhole, stretching and securing the sleeve so that it is eased in to the full space of the armhole and is also evenly distriubted throughout. During this process, I will stretch, inspect, shift and secure until I am satisfied that the sleeve is properly positioned and stretched evenly all the way around.
A sleeve is prepared to be sewn into an armhole on a sweater by easing in the fabric and securing with sewing clips
At this point, I secure a piece of yarn and sew the sleeve in place using the mattress stitch and removing clips as I go around. I have always been pleased with the results when doing it this way, and I haven't had to pull it out and start over, like I did before I started using this technique. The sweaters are complete now and have been gifted. I hope the recipients enjoy the sweaters as much as I enjoyed crafting them. Next up on the needles are a few Christmas presents...stay tuned!
A small pocked on a baby sweater with cabling accents and flower detail
Finished Wee Wildflower sweaters, in sizes 6 years and 6 months